The Multi-Vendor Import/Update feature in The Uniform Solution program is a great tool for business owners that interact with vendors who are not Connected Partners. Importing and updating vendors may seem overwhelming, but using this training guide and video below, you’ll be a pro in no-time!
Step 1: Create a Vendor
To begin, you’ll want to reach out to your desired vendor and request their catalog. Request an electronic version of their catalog. It will typically come as an attachment to the email; download and save it. Make sure to save the file in a place that you can easily locate. Typically, your computer’s desktop is the easiest place to save a file.
Once the catalog attachment has been downloaded and saved, you’ll need to create the vendor in The Uniform Solution program, get the list of file requirements, and obtain a “.csv” file reader. In this blog, I’ll be using Microsoft Excel to make edits to the “.csv.” file.
To create a vendor in the vendor list, open The Uniform Solution program:
-
Go to Lists > Vendors/Mfg
-
Select the Vendor button in the bottom left-hand corner.
-
Select New Vendor and the Adding Vendor form will open.
-
Fill in the Name and Location
-
Decide on a desired Vendor Code. Make sure it’s what you want, because once the changes are saved, the vendor code cannot be changed.
-
The Contact and Email Address field are optional but are great ways to store a vendor contact that you may later need; such as an email you want the purchase orders to be sent to.
-
On the Pricing tab, set up your desired retail pricing formula.
-
Great! The new vendor has been created, and it’s time to see the requirements that the file must meet to be successfully imported into The Uniform Solution program. To see the full list of requirements, highlight the desired vendor > right-click > select Multi-Vendor Import/Update

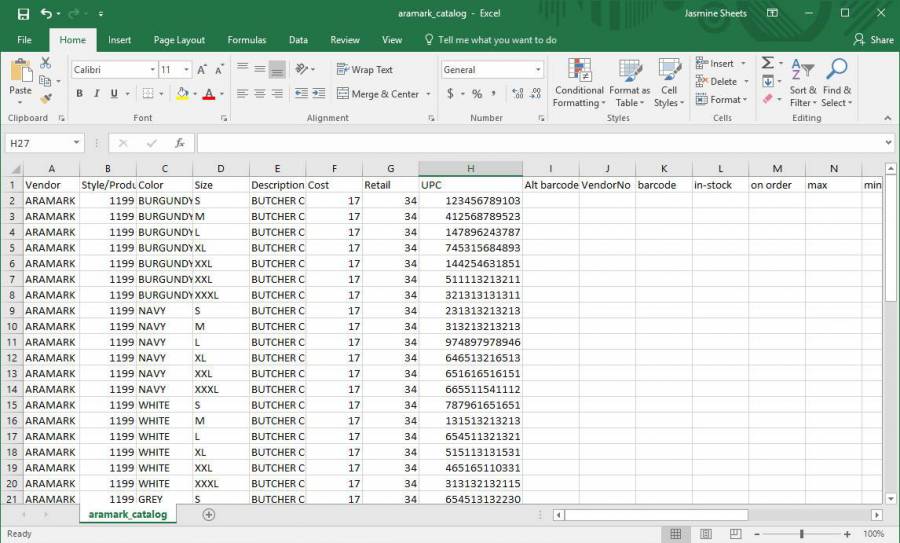
An active screen entitled “Import/Update Inventory for Multiple Vendors?” will appear listing the requirements for the “.csv” file. Write these down. The listed criteria are the headers for each column in the vendor catalog file. Even if the column will contain no information, it is important that the header is there as a placeholder.
Step 3: Catalog File Edits
With a detailed list of everything that needs to be imported, it’s time to do a little work on the file you were given from the vendor. You’ll first want to open it up and look at the current column headers. Remember, The Uniform Solution program has already given you exactly what you’ll need to import, so anything extra in the file you are given should be deleted. It’s also very important that if there is a column on the criteria list that is not in the file already that it is added.

Once all changes have been made, save it. Make sure it’s saved in a “.csv” format and saved in a place that’s easy for you to navigate to (typically the desktop).
Step 4: Import Catalog File
Let’s head back into the program and import the catalog.
-
To begin the catalog import in The Uniform Solution program, go to Lists > Vendors/Mfgs.
-
Highlight the desired vendor
-
Right-click and select Multi-Vendor Import/Update
-
Like we saw previously, you’ll see a screen outlining the criteria of the file, Select Import.
-
Navigate to the saved “.csv” file and select Open.
-
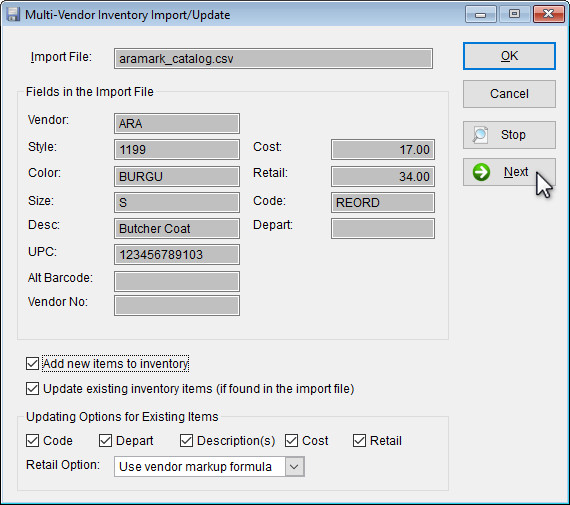
An active screen entitled, Multi-Vendor Import/Update will appear. Here you’ll be able to see what will be imported and make any desired changes.
-
Selecting the Next button will allow you to see each individual item that will be imported.
-
Once you’re satisfied with the file, simply select OK.
-
A screen entitled, “Ready to Import?” will appear. If the records look correct, select Yes.
-
When the import is complete, your import results will display letting you know how many items were added, updated, duplicated, or had duplicate UPC’s.
-
Select OK.
-
The items have now been added to your inventory under the desired brand.
-

