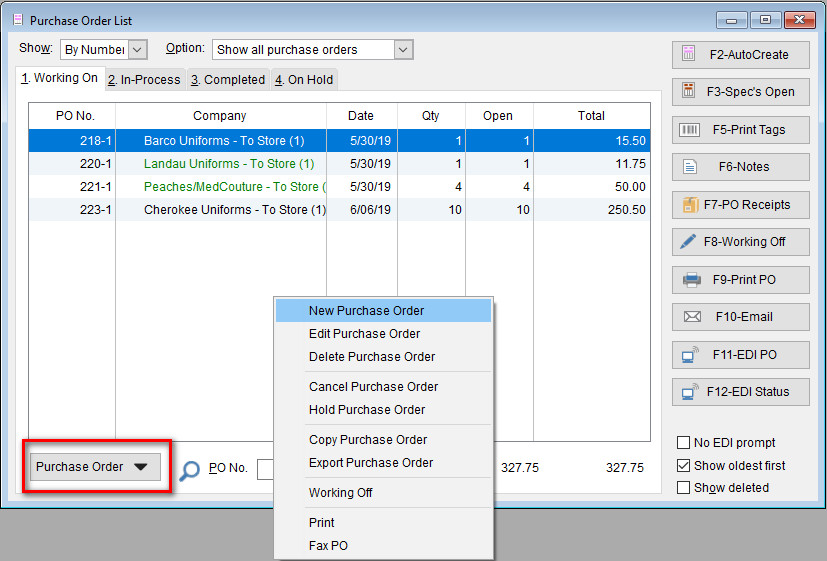
The Purchase Order List is used to create and manage purchase orders that are created in the program. The program uses purchase orders to fulfill special orders and to replenish retail stock levels.
To open the Purchase Order List screen, select the PO button on the menu bar at the top of the screen. When the screen opens, this is where you can insert, change, delete, cancel, or copy purchase order. You can also move purchase orders from “Working On” to the “Working Off tab.
There are two ways to create purchase orders; Auto and Manual.
Auto-Creating A Purchase Order
The AutoCreate Form in the program is used to set the options the program should make when generating purchase orders automatically. So, when you select to Auto-Create a purchase order, the program will automatically create a purchase order based on your selections on the screen.
To auto-create a purchase order, click on the PO button on the menu bar at the top of the program.

When the Purchase Order List screen opens, press the F2-AutoCreate button on the right-hand side of the screen.

The “Purchase Order Options Screen” opens and this screen is where you will select the criteria to auto-create your purchase order. There are two tabs to choose from when auto-creating a purchase order: the Options tab and the Advanced tab.
Options Tab is where you select the criteria for ordering and tell the program what you want to order according to the settings that are selected.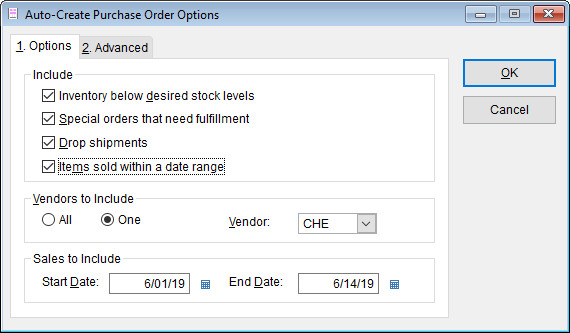
- Inventory below desired stock levels – choose this option to order inventory items with stock levels below desired minimum levels. NOTE: When selecting to order items with stock levels below desired minimum levels, you must have your max and mins set in the inventory.
- Special orders that need fulfillment – choose this option to auto-create a purchase order for any special order items that require fulfilling.
- Dropship Shipments – choose this option to auto-create a purchase order for any drop-ship orders. Each drop-ship order is placed on a separate purchase order.
- Items sold within a date range – choose this option to auto-create a purchase order according to what was sold during a selected range of dates. When you select this option, the “Sales to include” section will appear at the bottom of the screen.
- Vendors to include – choose All or One.
- Vendor field – use the drop-down list to select the vendor you wish to auto-create the purchase order for.
- Sales to include – enter the beginning and ending dates in the date range fields.
NOTE: If you are working in a multi-store environment, purchase orders can be created for all stores or selected stores.
- All – choose this option to create purchase orders for all stores.
- Selected – choose this option to create purchase orders for a selected store or stores. When chosen, the Store field is displayed.
- Stores – Enter the store number you want to create the purchase order for, and if creating for multiple stores, separate the store numbers with commas (e.g., 1,3,4,5).
NOTE: Advance Options Active message will appear at the top of the Auto-Create Purchase Order Options screen if any of the options on the Advanced tab are selected, and is displayed to ensure the user is aware that some of the advanced options are currently active.
Advanced Tab contains additional settings used to control the auto-create procedures. The options are to provide set minimum order quantity and amounts, and stock reordering can be limited to specified inventory code.
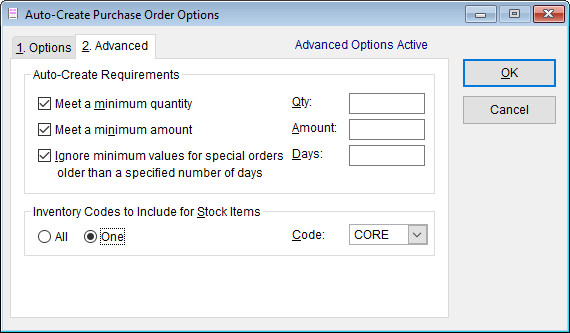
- Meet a minimum quantity – select this option to require a minimum order quantity for the purchase order. NOTE: if the number of items on the purchase order doesn’t meet the minimum, then the purchase will not be created. When you select this option, the quantity field will be displayed.
- QTY – enter the minimum quantity of items that must be on the purchase order for the purchase order to be created.
- Meet a minimum amount – choose this option to set a minimum cost amount for the purchase order. If the cost is lower than the set minimum, the purchase order will not be created. When you select this field, the Amount field displays.
- Ignore minimum values for special orders older than a specified number of days – select this option to ignore any minimum requirements for special order items older than a specified number of days. Choosing this field will display the Days field.
- Days – the age of the special order item for any minimum requirements to be ignored.
- All – choose this option to include all inventory items regardless of inventory code.
- One – choose this option to limit to selected code.
If working in a multi-store environment, you will have the following options:
- Separate purchase orders by store – choose this box to generate separate purchase orders for each location. Note, this option must be selected if you plan on drop-shipping the purchase order directly to each location.
- Dropship the purchase orders to each store – choose this box if merchandise is ordered by one store but sent to another. Note: when multi-location polling is used, and a drop-ship is assigned to a store on a purchase order, the only location that can receive the items from the purchase order will be the location where the drop-ship store is “Local.”
NOTE: Advance Options Active message will appear at the top of the Auto-Create Purchase Order Options screen if any of the options on the Advanced tab are selected, and is displayed to ensure the user is aware that some of the advanced options are currently active.
Creating A Purchase Order Manually
To manually create a purchase order, click on the PO button on the menu bar at the top of the program. The Purchase Order List screen opens.

There are two ways to create a manual purchase order list. 1) You can right-click in a blank area on the Purchase Order List screen and left-click “New Purchase Order” or click the Purchase Order button on the lower left-hand corner of the screen and select “New Purchase Order.”
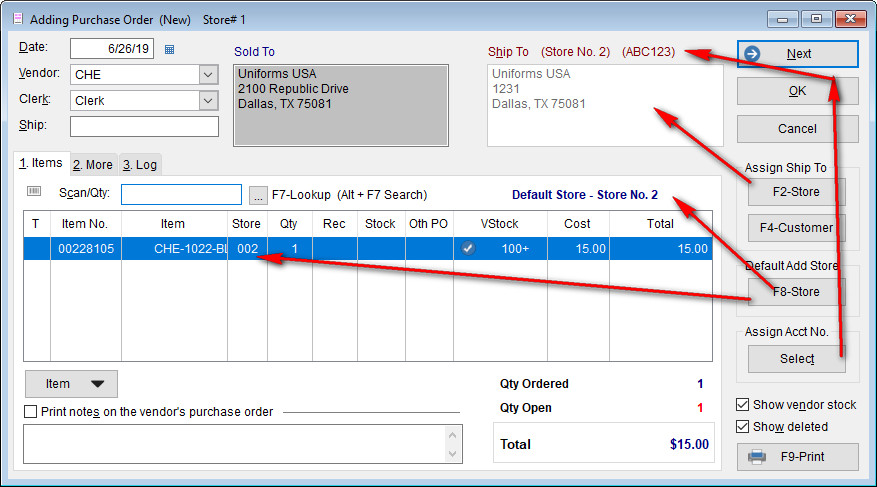
The Adding Purchase Order screen opens. Enter the Vendor you wish to create the purchase order for, and then add the items by using the F7-Lookup (Alt+F7 Search) button.
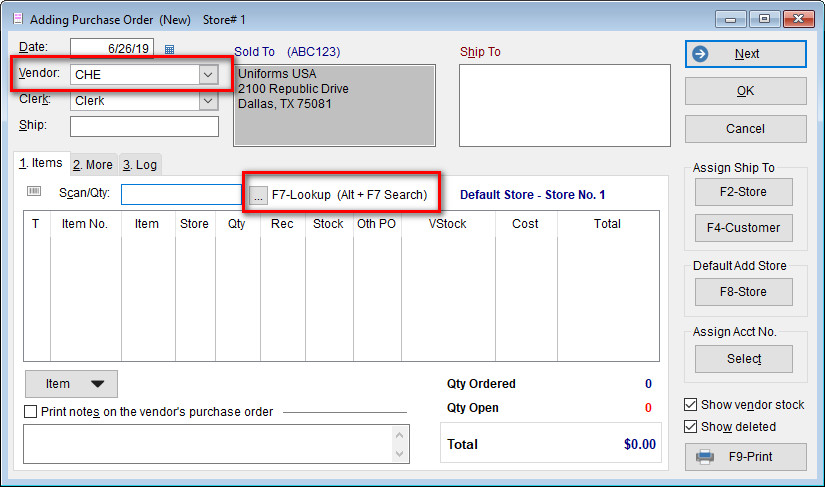
If you have multiple locations and want to create a purchase order for another location, you will need to use the buttons on the right-hand side of the screen to assign the purchase order to another location.
F2-Store – chose this button to see the list of stores and assign the ship to address to another location.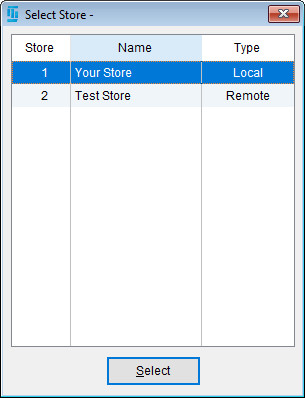
F4-Customer – chose this button if you will be assigning the purchase order to a customer. When selected, the Customer List will open; select the customer you want to assign the purchase order too.
F8-Store – chose this button to set the default store number that the purchase order is being created for.
Select – chose this button if you want to change the account number that the purchase order will be assigned to.
