The Multi-Vendor Import/Update feature in The Uniform Solution is a powerful tool for business owners who work with vendors that are not Connected Partners. This feature allows you to import and update vendor catalogs quickly and efficiently. Follow the guide below to become a pro at using this tool!
1. Create a Vendor
Before you can import a vendor catalog, you need to create the vendor in The Uniform Solution program.
• Contact the Vendor
-
-
- Reach out to your desired vendor and request their catalog, preferably in electronic format. Typically, this will come as an email attachment as an excel document.
- Download and save the catalog file in an easily accessible location on your computer (e.g., the desktop).
-
• Create the Vendor in the Program
-
-
- Open The Uniform Solution software.
- Navigate to Lists > Vendors
- Select the Vendor button at the bottom left-hand corner.
- Click New Vendor, and the Adding Vendor form will appear.
- Fill in the required information:
- Name and Location.
- Choose a Vendor Code (make sure this is final, as it cannot be changed once saved).
- The Contact and Email Address fields are optional but helpful for storing vendor contact details.
- On the Pricing tab, configure your retail pricing formula.
- Once everything is filled out, click OK to save.
-

2: Review Import Requirements
Once the vendor is created, you need to understand the file requirements for the import.
• Highlight the newly created vendor in the list.
• Right-click and select Multi-Vendor Import/Update.

• A screen will appear titled Import/Update Inventory for Multiple Vendors?.
• The system will display the file requirements, including the necessary column headers for the vendor catalog file.
-
-
- Even if a column does not contain any data, the header must be present as a placeholder.
-
Step 3: Edit the Catalog File
Now that you know the import requirements, it’s time to edit the vendor’s catalog file.
• Open the vendor catalog file you downloaded from the vendor.
• Review the current column headers.
-
-
- Compare them with the requirements outlined by The Uniform Solution.
- Remove any extra columns not needed.
- Add any missing columns that are required for the import.
-
Important Note:
• The UPC column must show the full UPC number. When opening a .csv file in Excel, the UPC may display as the first three digits followed by “+11”. To correct this:
-
-
- Highlight the UPC column.
- In Excel’s toolbar, select Number from the Number section to display the full UPC correctly.
- Once all necessary changes are made, save the file in .csv format and place it in a location that’s easy to access (e.g., your desktop).
-
Step 4: Import the Catalog File
Now that the catalog file is prepared, it’s time to import it into The Uniform Solution program.
• Go to Lists > Vendors in the program.
• Highlight the desired vendor.
• Right-click and select Multi-Vendor Import/Update.
• You will see the Import/Update Inventory for Multiple Vendors? screen outlining the file criteria again.
• Click Import and navigate to the saved .csv file. Select Open.
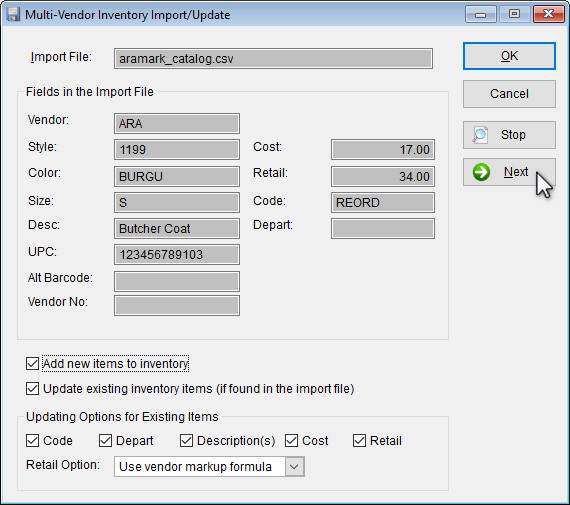
• The Multi-Vendor Import/Update screen will appear, allowing you to review the data before import.
• Click Next to see each individual item that will be imported.
• Once you’re satisfied with the file, click OK.
• A confirmation screen will appear titled Ready to Import?. If everything looks correct, click Yes to proceed.
• When the import is complete, a results screen will show how many items were added, updated, or had issues (such as duplicate UPCs).
• Click OK.
The items are now added to your inventory under the correct vendor.
Important Notes
- Even if a vendor is not a Connected Partner, you can still fax or email purchase orders using the program.
- When emailing a purchase order to a vendor, the “To:” field will be automatically populated with the vendor’s contact details entered during vendor setup.
📌 Need more help? Visit our Training & Onboarding site, explore the Knowledgebase, or submit a ticket.